
How to Protect a Roof With a Tarp
A tarp is not the most attractive solution to roof damage, but it can provide an effective temporary fix until you can get a professional repair or replacement. Before climbing onto your roof, carefully measure the damaged area and select a tarp that is large enough to accommodate it, with at least four feet of overhang from the peak.
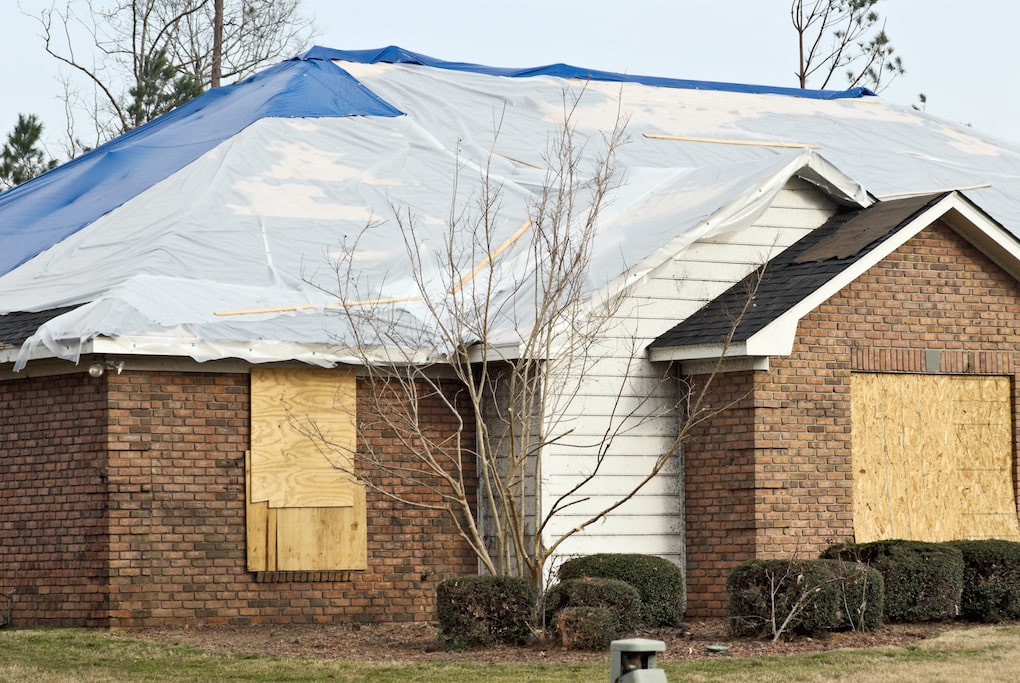
Temporary Coverage
As a temporary solution to protect your roof from further damage, a tarp can prevent holes or missing shingles from turning into leaks. It can also keep new rain, snow and wind from compounding the problem and possibly damaging your home. While the tarp might not be aesthetically pleasing, it is a smart and practical fix to safeguard your home while you wait for professional roof repairs to be completed.
To tarp your roof, first examine the damage and determine what size tarp is needed. This can be done by surveying the roof from a ladder or wearing a safety harness to inspect the damaged areas physically. You can also use a drone to get a bird’s eye view of the entire roof. Once you have a good idea of the damage, choose a tarp that is large enough to cover the damaged area and allow for three or four feet of excess on all sides. If the tarp is going to be covering any features on your roof such as chimneys or plumbing vents, make sure you account for them when measuring and cut a hole in the tarp where needed to avoid blocking them.
Once you have the tarp in place, it can be secured with wooden boards or sandbags, depending on your preference. While sandbags may work for a short amount of time in mild weather, wooden boards will be more secure and longer-lasting.
When securing the tarp, roll a wooden board into the peak end of the tarp and nail it to create a weighted anchor. Stack additional boards on the other two ends of the tarp to ensure it is as taut as possible.
You should periodically check the tarp, especially after storms or heavy rainfall, to make sure it is secure and not shifting around. If you notice the tarp shifting or showing signs of damage, it is best to call in the professionals for repair immediately to reduce the risk of further roof leaks and water damage to your home. You should also consider getting your roof repaired professionally by Roofing Companies Brandon FL if you have noticed any underlying issues with the structure of your roof.
Waterproofing
If a roof is damaged by bad weather or falling tree limbs, a tarp can protect it and the inside of your home from further damage until the roof can be repaired. A tarp can also keep new rain, snow or wind from pounding on the roof and making holes or other damage worse. Although it’s not ideal, homeowners can put up a tarp on their own for a quick and temporary fix, but the process requires careful attention to detail. For example, it’s important to ensure that all edges and excess tarp are secure with sturdy nails or screws to reliable plywood boards so the tarp holds up in heavy rain or wind.
First, climb up to the roof and clear away any debris that could rip or tear your tarp during or after installation. Then, make sure you have the right supplies – a ladder, broom or brush, knife, cordless drill and 2×4 wooden planks with 3 1/4 nails on hand. You should also have a tarp large enough to cover the damaged area of your roof plus a few feet for overlap, and one with UV inhibitors to help it last longer.
After laying out the tarp over the damaged area, lay down the wooden boards and nail them into the tarp and roof with a hammer or screw gun. For added support, place a board on either side of the peak edge and wrap a piece of 2×4 around it. This helps prevent the board from flapping in the wind and can also add a layer of protection in case the tarp gets punctured.
For the rest of the tarp, space the batten boards six feet apart horizontally across the tarp and two feet apart vertically. Nail them into the tarp and roof using your hammer or screw gun, then tack them to the anchor board with cap nails for extra strength. If the tarp is placed over features on your roof like chimneys and plumbing vents, account for them when placing the batten boards to prevent water from working its way into these areas.
Insect Control
When homeowners think of the hazards that threaten their roof, they often don’t consider insects and rodents. But these creatures can create significant damage to the structure of your home. They can chew wires, nest in your insulation and leave behind droppings. They can also introduce diseases and odors. Whether they’re chewing through your shingles or gnawing their way through wood framing, it’s crucial to take action when you spot signs of infestation.
Fortunately, you can keep pests out of your roof and attic with simple preventative measures. In addition to sealing cracks and repairing broken flashing, you can use deterrents like plastic owls and red fox urine. These products can be sprayed around the perimeter of your home to keep birds and squirrels away from the area. You can also trim back foliage so there aren’t places that could act as bridges for pests to climb onto the roof.
The most common pests that target homes are squirrels, raccoons and mice. These animals seek warm areas to raise their young, and they can cause serious damage to your roof and attic if they get in. One raccoon, mouse or squirrel can start an infestation, so it’s important to watch for signs of pests living in your attic. If you see signs of nesting, droppings or oily residues on the floor, it’s time to call a pest control professional.
Another way to protect your roof from unwanted pests is to have a professional install a bird or squirrel guard. These barriers look similar to chimney caps and can be installed on the exterior of your home to prevent squirrels from climbing up your gutters and getting into your attic.
You can also apply a sealant that is effective against wood-destroying insects, such as carpenter ants and termites. You can also use silicone caulk to seal any cracks or crevices in your roof and trim back overgrown vegetation so there aren’t any areas where pests can hide. These precautions can save your roof from costly damage and ensure that your family is safe and comfortable.
Wind Protection
A tarp may be more unsightly than a new roof, but it does help protect your home from significant damage in the event of a hurricane. It also allows you to stay in your home while the roof is being repaired, which is far easier and less costly than relocating your family.
Before you start putting down tarps, check the weather conditions and postpone any work if high winds or rain are expected. Also, don’t attempt this task alone. You need a sturdy ladder and some assistance from a friend to climb up onto the roof to inspect the damage and tarp the area. Also, it’s best to wear safety equipment, including goggles, gloves and slip-free footwear.
Choose a heavy-duty tarp large enough to cover the damaged area. A good rule of thumb is to allow at least four feet of unused tarp on all sides of the damaged section. Partially unroll your chosen tarp and carefully position it over the affected area of your roof. If the tarp is not completely secure, it could blow away in the wind and cause further water damage to your home. To prevent this, tack down the peak ends of the tarp to a 2 x 4 board that is nailed into the roof.
To further stabilize the tarp, tack down more 2 x 4 boards inside the creases of the tarp. This creates a sandwich effect that will help your tarp stand up to the wind and rain. To do this, first nail the board to the tarp, then tack down the tarp over the top of the board. Repeat this process for the other two peak ends of your tarp.
Finally, fasten the tarp down to your roof using long roofing nails. Make sure that the nails are rust-resistant and robust enough to withstand harsh weather conditions. Otherwise, they may puncture through the tarp and cause further damage. If you do not have 2 x 4s, you can nail directly into the roof if your tarp is not too heavy. However, this is an unsafe practice and not recommended.
A tarp is not the most attractive solution to roof damage, but it can provide an effective temporary fix until you can get a professional repair or replacement. Before climbing onto your roof, carefully measure the damaged area and select a tarp that is large enough to accommodate it, with at least four feet of…